Perusall is a collaborative annotation tool that makes reading active, visible, and social. With Perusall, students engage with their readings, instructors, ideas, and each other in deeper, more meaningful ways. This page provides a roadmap to using Perusall in Canvas.
Note about hyperlinks: links to online guides and support documents will open in a new tab. Some will link to documents on the UO Teaching Support and Innovation website. Others link to Perusall's instructor support documentation at Perusall Support for Instructors.
NOTE: Be aware that some students may have barriers or concerns that prevent them from using Perusall in your course. To ensure that all students have equitable access to learning, we invite you to consider and provide alternative ways for students to engage with your course content and meet the assignment objectives. For more information on using digital tools, see the External Vendor Digital Tools in Teaching resource (opens in a new tab).
If you'd like to consult with UO Online about how to use Perusall in your courses, please contact us.
PDFs are likely the most common document type you might use with Perusall. In order for PDFs to be used with Perusall, you must ensure that they contain "selectable text." This means that the PDFs are not images of text, but text that can be highlighted. If your document is a scanned PDF, it must be put through the Optical Character Recognition (OCR) process. This process ensures that the PDF has selectable text and will allow students to highlight document text in Perusall.
Creating a Perusall Assignment is a Two-Part Process:
Part 1: Create an assignment in Canvas
Part 2: Create a matching assignment in Perusall
Assignment Set-Up Part 1
Create an Assignment in Canvas
Begin by adding a new Assignment in Canvas.
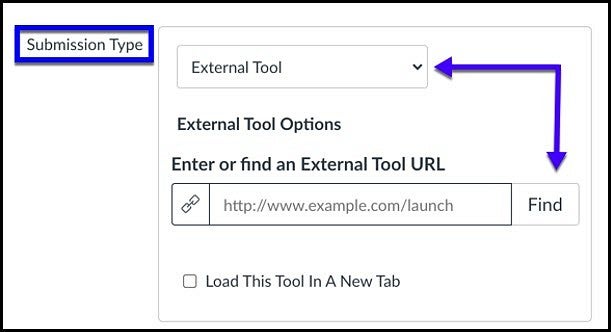
In the Submission Type field, select External Tool from the drop-down menu and then select Find.
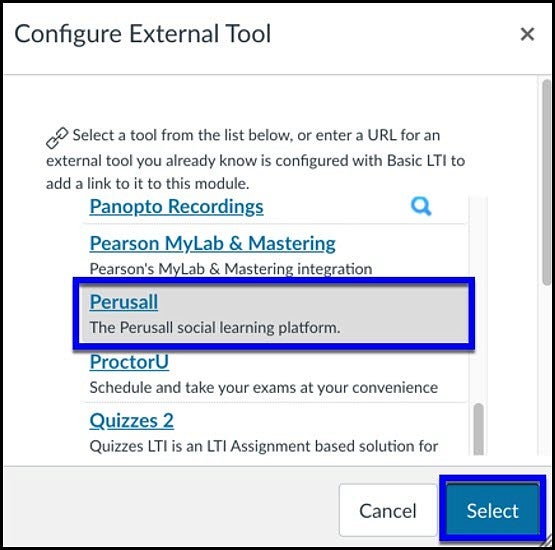
Scroll through the External Tools list to find Perusall.
Click on Perusall to highlight it and then click Select to confirm your selection.
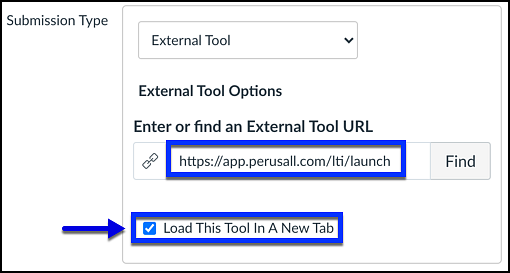
You will be returned to the Assignment set-up screen. Note that the URL text box is now populated with Perusall in the URL.
Be sure to check the Load This Tool in a New Tab box.
You can now finish setting-up the assignment by completing any Canvas Assignment setting you haven't already (i.e., assignment name, instructions, points, due date, etc.)
NOTE: When using Perusall for assignments, we recommend using the Until Date in Canvas as the Due Date for all assignments in Perusall. This will close the assignment in Canvas and not allow students to access the assignment in Perusall to make further annotations after the assignment close date.
When all assignment settings are complete, click Save or Save & Publish.
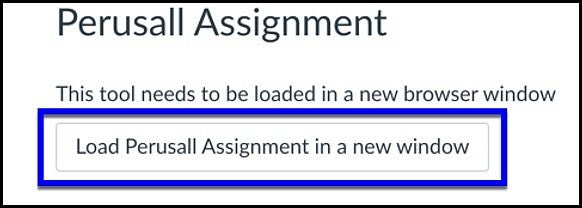
After saving the assignment, you will see the Load Perusall Assignment in a new window button. When students click on the assignment to begin it, they will see the same button. Clicking on the Load Perusall Assignment in a new window button opens the assignment in Perusall for students to complete.
Perusall New Course Set-up
The first time you create a Perusall assignment in a new Canvas course, you will need to do some set-up in Perusall. Click below for New Course set-up instructions.
Setting Up a New Perusall Course (click to expand)
Once the assignment is created in Canvas, click on the Load Assignment in a new window button to open Perusall.
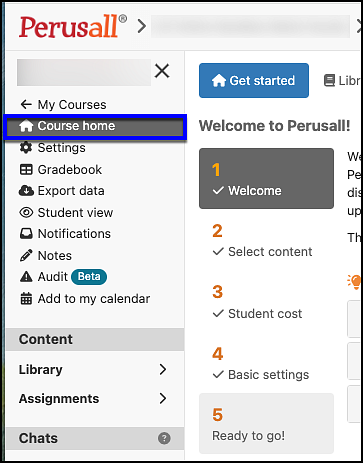
Course Home / Get Started
You will be taken to the Course Home section of Perusall. Move through the 5 sections under Welcome to Perusall! by selecting the Continue button.
Welcome contains tips for setting up your course.
Select content. Select Start with empty course unless you are copying from an existing Perusall course.
Select how you will be populating your library. Most faculty will be uploading their own course materials.
Student cost. Please set the student cost to $0 at this time.
Basic Settings. You will need to add a Department and verify your Grade sync to LMS preference. The default is to automatically sync individual assignment scores back to Canvas.
Ready to go! provides tips for encouraging student use.
Once you have completed these 5 sections, your Library, Assignments, and Students links will be active at the top of the screen.
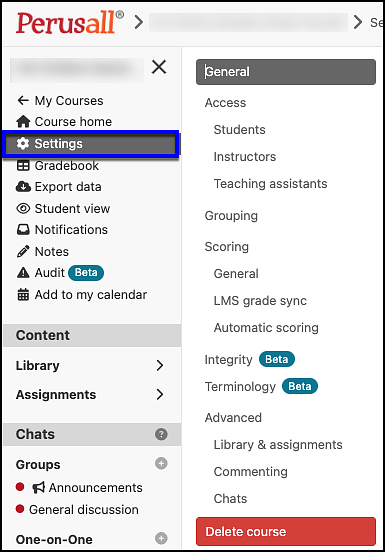
Settings
Next, go to Settings. The following information on course set-up is from Perusall's Getting Started webpage.
Navigate to Settings > General to set overall course information.
Navigate to Settings > Access to manage access to your course.
If you have GEs who should have instructor access to Perusall, select the Instructor tab and enter their email address to invite them into your course.
You can also allow other instructors to copy the content and settings (but not the student data) from your course by sharing a copy code with them.
Navigate to Settings > Grouping to manage discussion groups. Learn more about groups in the Groups in Perusall section below.
Navigate to Settings > Scoring to determine how Perusall will generate engagement scores. Scoring is done in Perusall using artificial intelligence and is based upon an algorithm.
Scoring, by default, is based on a score of 0-3. This can be changed in Settings > Advanced > Assignment Score Range. OR the Perusal score will be converted to the points scale in Canvas, if the Canvas assignment is worth a different number of points. Since the scoring is set for the course, select a range that students will understand. If all your assignments are worth 10 points in Canvas, set this range in Perusall to 0-10.
Navigate to Settings > Integrity [Beta] to configure tools for promoting academic integrity in your course.
Navigate to Settings > Terminology [Beta] to customize the course terms in the user interface to match your use of Perusall.
Navigate to Settings > Advanced to adjust fine-grained course options for comments, documents, and class chats.
The Advanced section has an option to automatically apply OCR to PDFs you upload. This is a good feature to have turned on. However, it is best practice to have your PDFs made into selectable text before you upload them into your Perusall library, as outlined in the Perusall & PDF Documents section above.
Be sure to click the Save changes button at the bottom of the Settings screen.
Assignment Set-Up Part 2
Create a Matching Assignment in Perusall
A best practice when introducing Perusall to a class is to have a practice Perusall assignment (worth minimal points) using your course syllabus as the PDF. This will give the students an introduction to Perusall, and they will read the syllabus more carefully.
The Library in Perusall is where you add any documents, videos, podcasts, etc. that students will review using Perusall. See Perusall's How do I add, edit or delete a document? for additional information.
There are three steps when creating an Assignment in Perusall:
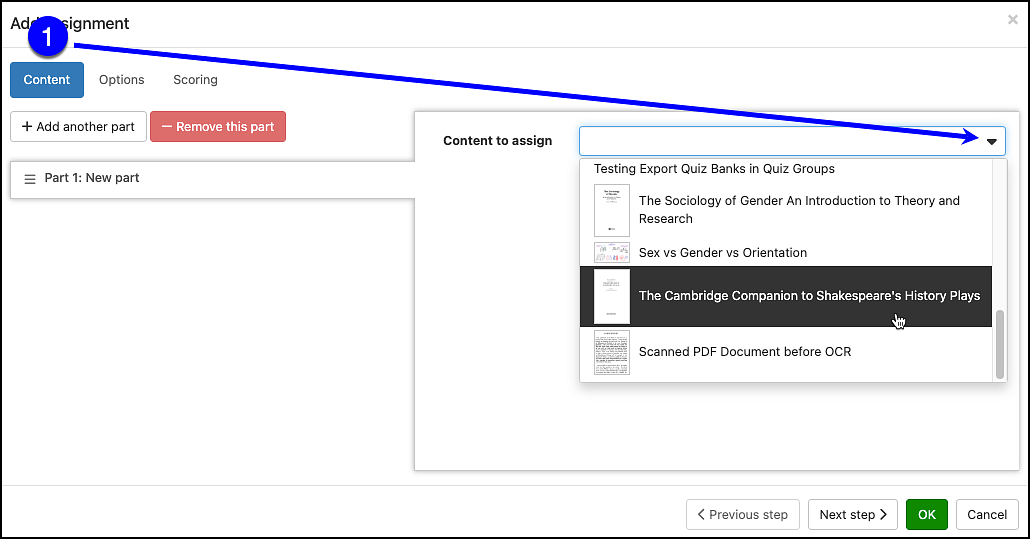
Step 1: Add/select Content
You can add 1 or several parts for students to engage with. Use the Content to assign drop-down menu to select content for the assignment.
Note: Content must be already uploaded to the Perusall Library to be available for selection here.
Once selected, you can customize which parts of a document to assign to students if you have a lengthy document.
To add additional parts to the assignment, select Add another part.
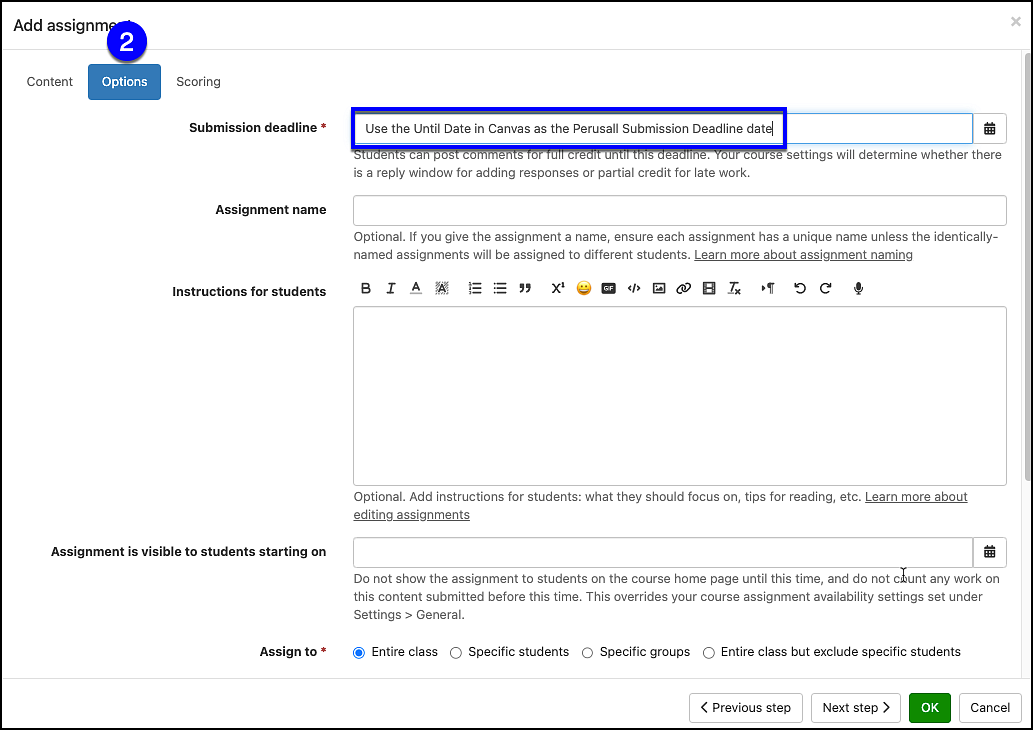
Step 2: Set Options
Submission deadline: we recommend using the Until date in Canvas as the Due Date in Perusall. This will close the assignment in Canvas and not allow students to access the assignment in Perusal to make further annotations after the closing date.
Assignment name: you must ensure that the assignment name in Perusall is the exact same as the Canvas assignment name. Otherwise grade sync will not work correctly.
Instructions for Students. You may already have instructions in your Canvas assignment. Add any Perusall specific instructions here.
Assignment is visible to students starting on. You can leave this field blank and rely on the availability date in Canvas.
Assign to. Ensure that you are assigning the assignment in Perusall just as you are in Canvas.
Anonymous posting. Regardless of what you set here, you, as the instructor, will always be able to see student names on comments, even if posted anonymously.
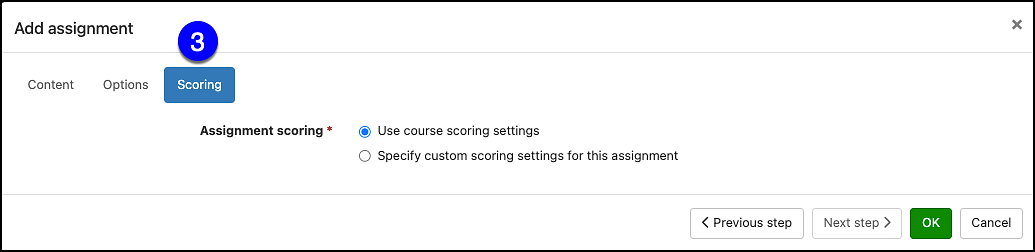
Step 3: Assign Scoring
You can use the default course scoring or specify customized scoring for the assignment.
For detailed information on scoring in Perusall, see Perusall's Scoring and Grades resources.
Select OK to save the assignment settings. Once the assignment is saved, you will see the Assignment Dashboard. Here is where you can View or Edit the assignment, Assign Grades or view the Confusion Report.
Student View
You may want to see how the Perusall assignment looks to your students. You must do this in Perusall. The Student View in Canvas will not display the Perusall interface. Student view is available on the Perusall Navigation menu
Note that using the Student View will log you out of Perusall to present the student view. Select the Return to your account link at the bottom left of the Perusall screen to return to your courses.
Alternately, you can close Perusall and reopen the assignment in Canvas.
Groups in Perusall
Perusall Groups
Students are enrolled in the Perusall course site when they click on the Load the assignment in a new window button in Canvas.
Perusall will begin to create groups automatically when at least 15 students have clicked on the assignment in Canvas and opened Perusall.
Perusall group assignments apply to all Perusall assignments in the course as groups is a course setting in Perusall. More information about Perusall Groups is available on the How do Groups Work? resource.
Want to use a Canvas Group Set?
Instructions for synching Canvas Groups with Perusall can be found on Perusall's Canvas Setup,
Warning: Perusall does not work with Canvas Group Sets if there is more than one Canvas Group Set in the Canvas course.
If you have more than one Canvas Group Set use Perusall to set up the groups.
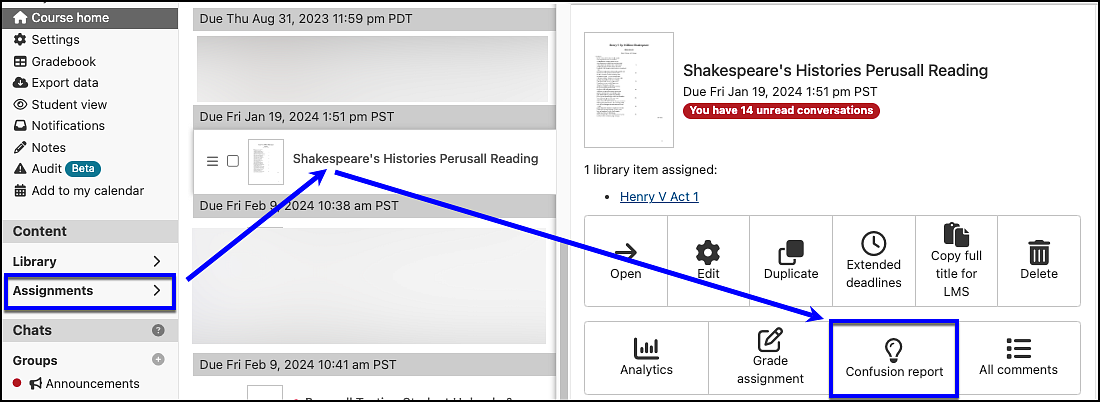
Confusion Report
Perusall provides instructors with an automatically-generated Confusion Report that summarizes general areas of student questions/confusion. This can be helpful in knowing when additional discussion or clarification might be provided to students.
In Perusall, select the Assignment, then select the Confusion report button in the assignment dashboard.
NOTE: The Confusion Report may not be available for assignments where there are only a small number of high-quality questions for Perusall to analyze.
Grades in Perusall
Grades in Perusall can be reviewed by selecting Gradebook on the left navigation menu.
You can manually Sync Perusall grades to Canvas by selecting the Synch to LMS button under each Perusall Assignment.
Note that grades, once released to students in Perusall are synched with Canvas Grades.