- Step 1: Log into the instructor portal of iClicker Cloud
-
Visit https://www.iclicker.com/ and go to your Active Courses List. Choose the course for which you want to view grades.
- Note: If you are using the Attendance Only feature, you will not have access to iClicker Gradebook feature.
- Step 2: Open Gradebook
-
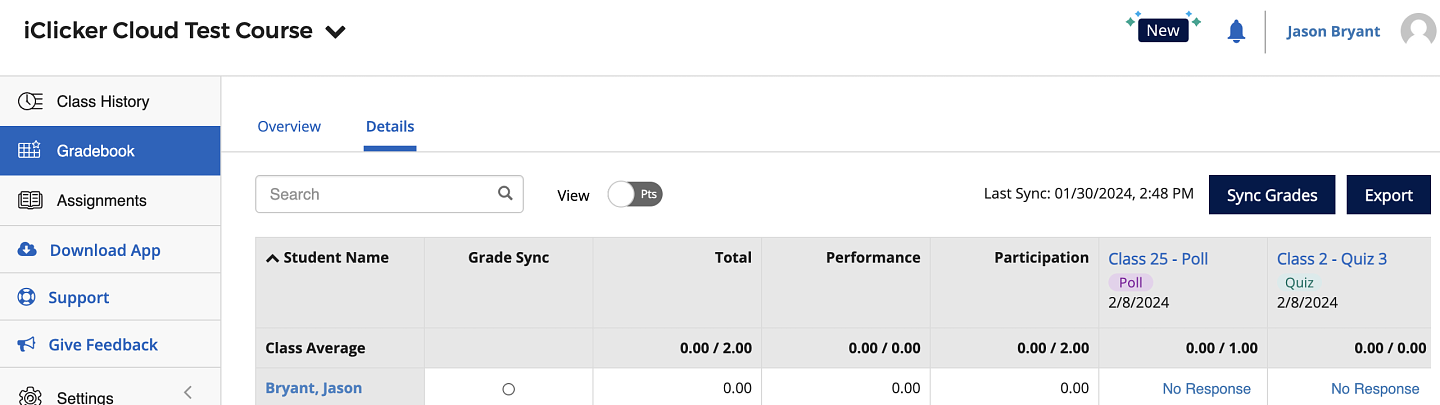
From the sidebar menu at top left, choose the “Gradebook” option, which opens to the Gradebook "Overview."
Choose the "Details" overview for insight into
- Gradebook details
- Columns of the most recent activities appear in the lefthand side of the gradebook and are each listed by the class session number, type of activity, and date the activity was deployed (unless you’ve previously renamed those activities).
- Student participation in activities is reflected by points accrued. "No Response" is indicated if the student did not participate.
- Columns of the most recent activities appear in the lefthand side of the gradebook and are each listed by the class session number, type of activity, and date the activity was deployed (unless you’ve previously renamed those activities).
- Activity details
- Each activity title can be clicked to open a window with "Activity Details" with options to adjust the activity title, review number of points and class averages, and manage options either to download analytics or to delete the activity. If you make changes, click the "Save" button in the window.
- Each activity title can be clicked to open a window with "Activity Details" with options to adjust the activity title, review number of points and class averages, and manage options either to download analytics or to delete the activity. If you make changes, click the "Save" button in the window.
- Student Grades
- You can adjust grades for individual students by clicking a student’s activity grade, which opens a window, showing original score and adjusted score. The adjusted score field can be manually edited and, if changes are made, click the blue “Save” button.
- Gradebook details
iClicker Cloud: Grading
iClicker Cloud: Grading
This document guides instructors on grading in iClicker Cloud, detailing how to view grades in iClicker Cloud and how to upload grades to Canvas.
Before proceeding with this checklist, confirm that your iClicker Cloud account setup is complete. For account setup instructions, visit Getting Started with iClicker Cloud.
Related Topics:
iClicker
How to View and Adjust Grades in iClicker Cloud
How to Upload iClicker Cloud Grades to Canvas
- Step 1: Sync Your Course Roster
-
It is recommended that you sync your roster to capture the most accurate student data before syncing grades between iClicker Cloud and Canvas. To sync your roster
- Choose the “People” option in the lefthand sidebar menu
- Click the blue “Sync Roster” button at top of the list of students, which opens a window communicating "active syncing" with Canvas. The sync will be complete once the banner at the top of the window reads, “Sync Complete.”
- Details related to further actions specific to individual students may appear in this window (for example, a list of those who may not yet be enrolled in iClicker Cloud might be included). Determine whether or not you need to follow up with these students before syncing grades.
- Details related to further actions specific to individual students may appear in this window (for example, a list of those who may not yet be enrolled in iClicker Cloud might be included). Determine whether or not you need to follow up with these students before syncing grades.
- Use the blue button to “Close” this window, which returns you to the People view of the course. (Notice at the center-top of the page text that confirms the date and time when the “Last Sync” occurred.)
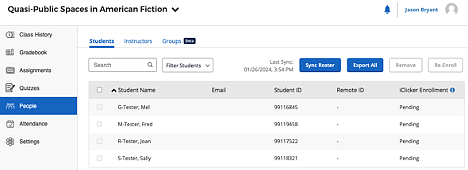
- Choose the “People” option in the lefthand sidebar menu
- Step 2: Sync iClicker Cloud Grades to Canvas
-
-
Return to the Gradebook view of your course via the lefthand sidebar. (For reference, note the text along the center-top of the page that records the last date/time a grade sync occurred.)
-
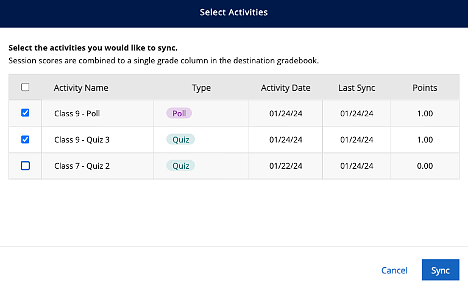
When ready, click the “Sync Grades” button.
-
A “Select Activities” window will open, where you can indicate which activities you’d like to sync. Once indicated, click the blue “Sync” button in this window
-
The window indicates active syncing with Canvas until the banner at top reads “Sync Complete.”
-
Details related to further actions specific to individual students may appear in this window (for example, a list of those who may not yet be enrolled in iClicker Cloud might be included). Determine whether or not you need to follow up with these students before syncing grades.
-
-
Use the blue button to “Close” this window and be returned to the iClicker Cloud course Gradebook.
-
- Step 3: Verify Grade Sync in Canvas
-
A "Grade Sync" column appears in your iClicker Cloud Gradebook when you have the integration active, displaying the grad sync status for each student. You can move your cursor over each icon to see a tooltip explanation.
- Click the "Sync Grade" button on the Gradebook page to initiate the grade sync. Note that a roster sync is automatically included with each grade sync to ensure that the roster is as up-to-date as possible before grades are sent.
- A dialog box opens with a list of your course's polls and quizzes. Select which activities you want to sync to Canvas, then click the "Sync" button.
- When complete, a summary of the sync request is shown with the number of students successfully synced and any error details will be listed.
- This summary dialog box will look the same as the one provided after a roster sync. Changes to previously synced scores you make in Canvas will be overwritten the next time iClicker Cloud is synced. We recommend making score changes directly in iClicker Cloud, then sync to Canvas to ensure alignment between the two gradebooks. The iClicker Cloud-Canvas grade sync is based on session ID when syncing individual polls and quizzes. Changing the name of a poll or quiz after you sync gradess will not break the original association, but it might be confusing if your activity names do not match between Canvas and iClicker.
- Click the "Sync Grade" button on the Gradebook page to initiate the grade sync. Note that a roster sync is automatically included with each grade sync to ensure that the roster is as up-to-date as possible before grades are sent.
iClicker Support
If you have additional questions, you can search or filter the iClicker Knowledge Base (link opens in a new tab)
You can also contact the following individuals directly:
- Melissa O'Brien: melissa.obrien@macmillan.com
- Brendan Baruth: brendan.baruth@macmillan.com