NOTE: If you have questions about the end of Spring term 2024 transition away from iClicker Classic, or are piloting iClicker Cloud, please refer to the iClicker Transition document (opens in a new tab).
Getting Started with iClicker Classic
Getting Started with iClicker Classic
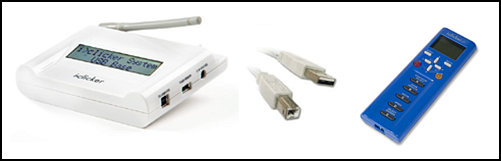
Get started with iClicker Classic by picking up an iClicker kit (iClicker base, connection cord, blue instructor iClicker remote, and white Student iClicker) from UO Online in PLC 68. Then follow these set-up steps to get up and running.
Related Topics:
iClicker
iClicker Cloud
Step 1: Pick up your iClicker Classic Instructor Kit
Before downloading the iClicker Classic software, be sure to pick-up your iClicker Classic Instructor kit (iClicker base, connection cord, blue Instructor Remote, and a white Student Remote) from UO Online at PLC 68.
Students will interact with iClicker in your course by using the Student iClicker Remote which can be purchased at the UO Bookstore.
Step 2: Download the iClicker software
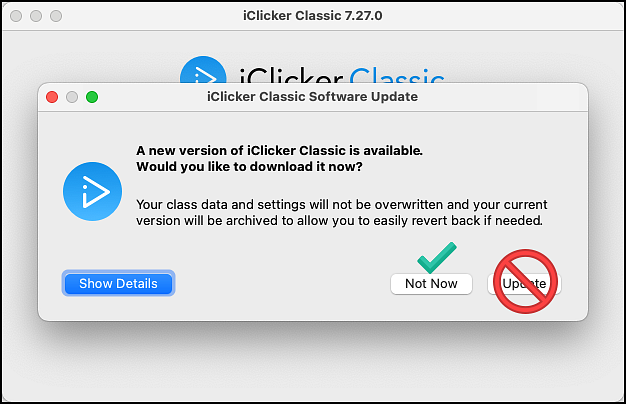
NOTE: DO NOT UPDATE TO iClicker 7.28! The only version of iClicker Classic that will work at UO is 7.27.0.
You will be prompted to Update iClicker every time you open it. Always select Not Now.
If you accidentally update to version 7.28, please contact us at uoonline@uoregon.edu and we will help reinstall the 7.27 version that works correctly with UO’s Canvas instance.
Windows Users:
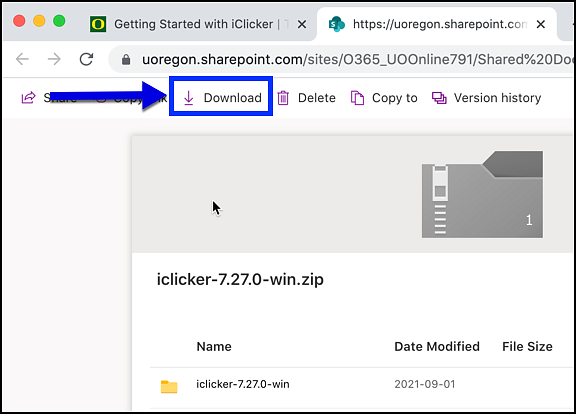
1. Access the iClicker software for Windows at this SharePoint site.
2. Once here, click on the Download option on the top menu
3. Unzip the file after downloading it.
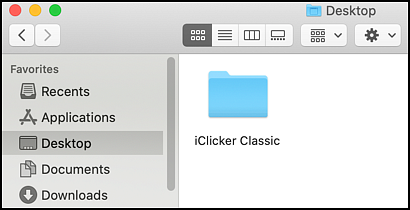
All necessary iClicker Classic folders and files will be created. We suggest you create and add an iClicker Classic folder to your Desktop to allow for quick access in the classroom.
Mac Users:
1. Download the iclicker-7.27.0-mac.dmg file.
2. Create an iClicker Classic folder on your desktop (for quick access during class) called "iClicker Classic" or something similar.
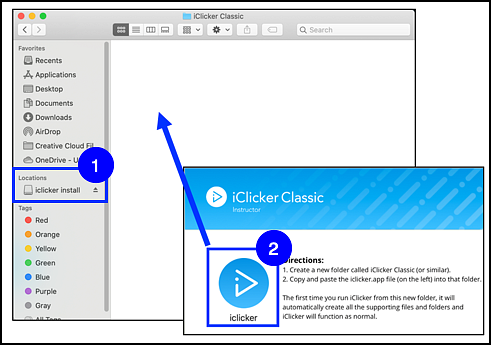
3. Double-click the downloaded .dmg file (iclicker install under Locations in Finder) to open it [1]. Drag the iClicker.app file [2] to new iClicker Classic folder.
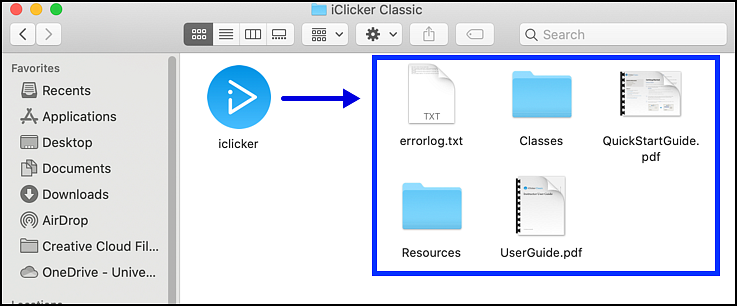
4. Double-click on the iclicker circular app icon to run iClicker Classic.
- The first time you run iClicker Classic from your new iClicker folder, it will automatically create all the supporting files and folders to allow iClicker Classic to function.
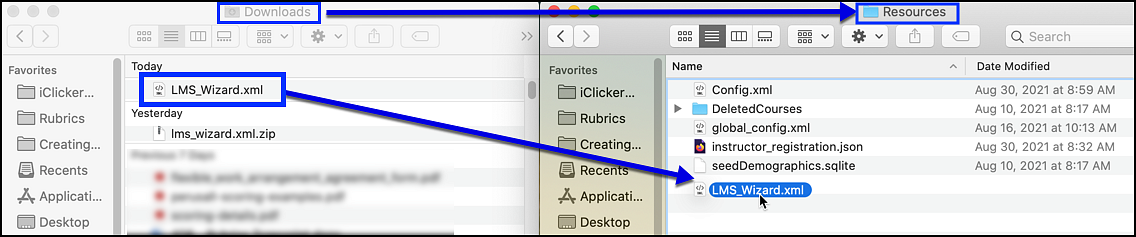
5. Download the LMS Wizard zip folder by clicking this LMS_Wizard.xml link. The folder will automatically download.
6. Drag the Zipped LMS_Wizard.xml file from your Downloads folder into the Resources folder in your newly created iClicker Classic folder.
7. Next, unzip the LMS Wizard.xml file.
- Be sure to unzip it ONLY after it's been placed in the Resources folder.
- Chrome users can double-click on the downloaded file in the download ribbon at the bottom of the Chrome window to unzip it.
- Safari users will need to locate the LMS_Wizard.xml zipped folder in their Downloads folder and double-click it there to unzip the file.
NOTE: Some Mac users may need to follow these additional steps to allow iClicker to record your computer’s screen.
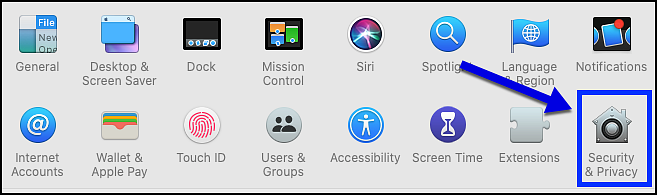
If prompted with a dialog box to allow iClicker to record your screen, select the Open System Preferences option to continue.

Select Security & Privacy
Scroll down to find Screen Recording and select it. Scroll in the right box to find iClicker Classic and check the box to allow the app to record the contents of your screen.
Exit System Preferences.

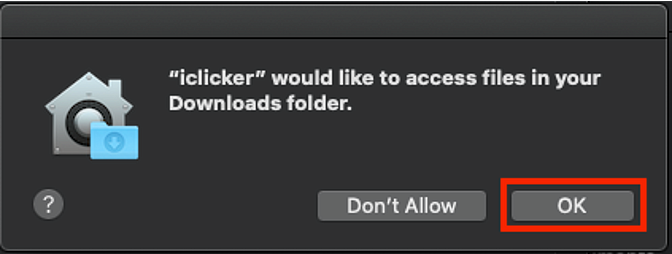
An additional dialogue box may appear to request access to files from your Downloads folder. If prompted, select OK to grant permission.
If you are not prompted by any dialogue boxes, your settings are already configured to allow iClicker to record your screen when using iClicker Classic.
NOTE: You will prompted to Update iClicker every time you open it. DO NOT UPDATE! Select "Not Now" every time.
Step 3: Add Your Course
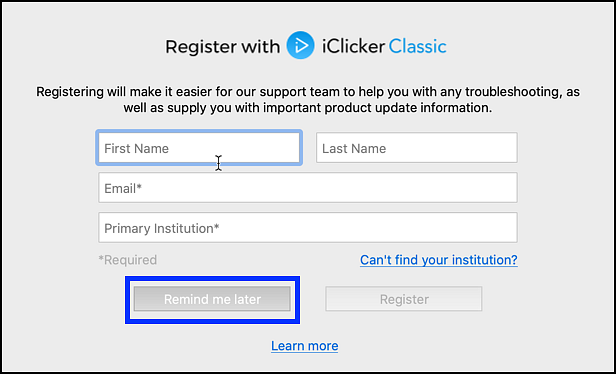
When you open iClicker Classic the first time, you will be prompted to Register with iClicker. You do not need to register to use iClicker. Click the "Remind me later" button to bypass registration.
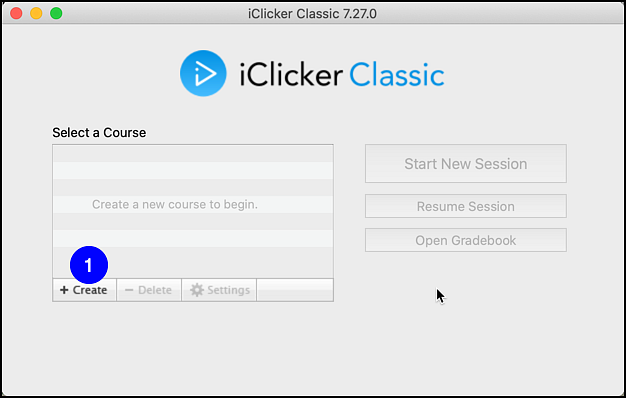
- When you see the Welcome screen in iClicker, click on the +Create button [1] to add your course.
- Name your course. This is a nickname for your ease of use.
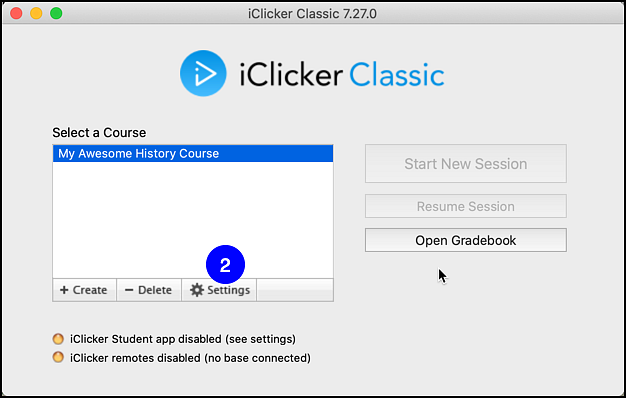
- Select the course by clicking on it and select Settings [2].
- Click the Gradebook tab [3] on the top of page.
- In the LMS Name [4], Canvas should be pre-selected.
- On the same page, click on Select course [5].
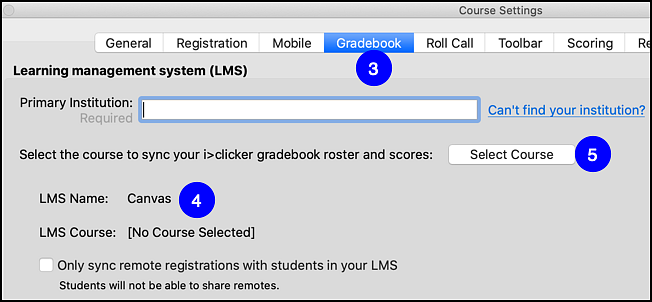
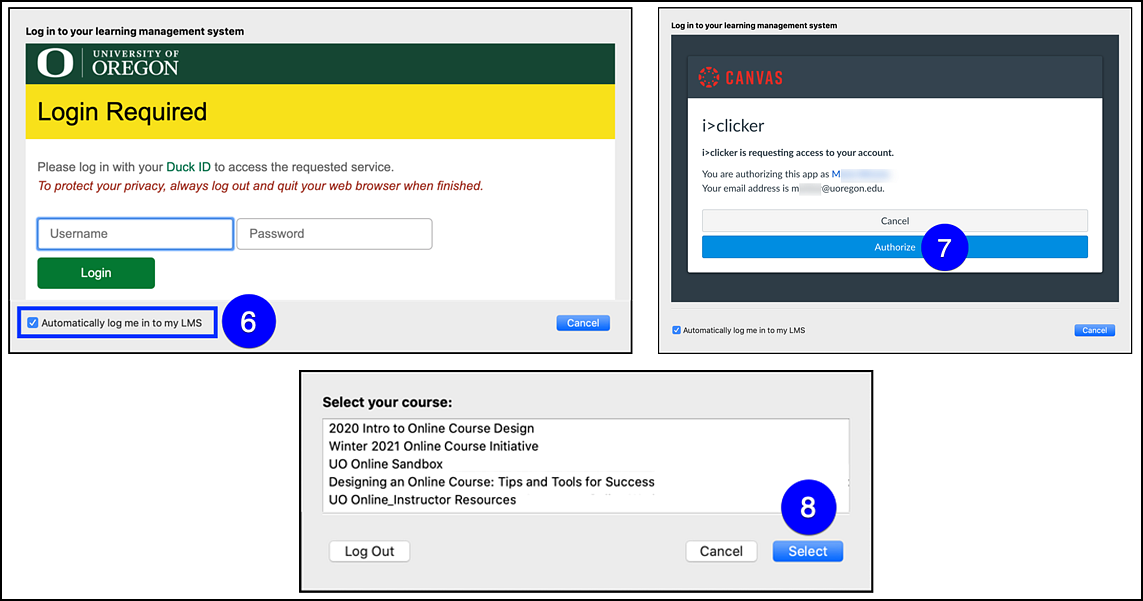
- A screen will pop up with the Canvas login screen. Enter your Duck ID and Password.
- Make sure the Automatically log me in to my LMS [6] box is checked at the bottom.
- Click on Authorize [7] on the next screen to authorize access to Canvas.
- A screen with your Canvas courses will display. Click on your desired course and click Select [8].
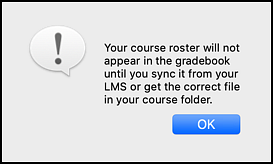
- You will get a pop-up notifying you that the course roster will not appear in the gradebook until you sync it from the LMS. You will do this in Step 5 below, so select OK to continue.
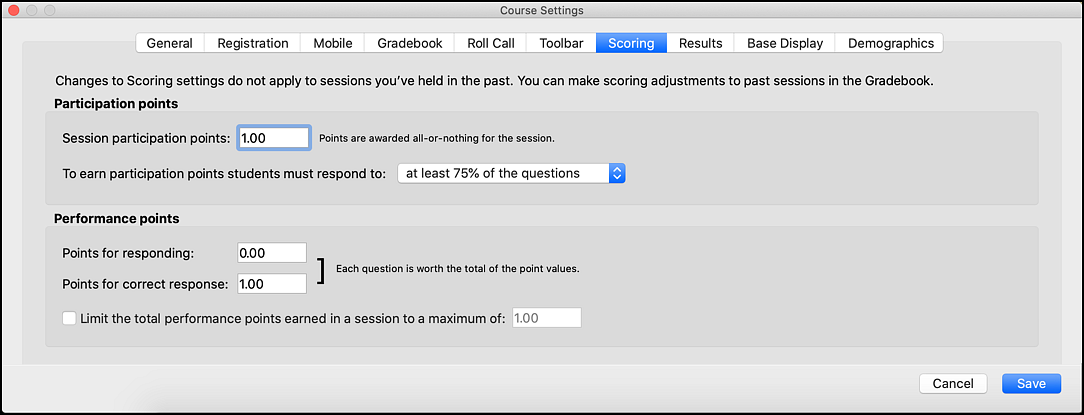
Step 4: Set-up Scoring for Your Course
- Click on your course name again to highlight it, click Settings, then click the Scoring tab at the top of the page.
- From here chose to give Participation points, Performance points, or both.
- When done, click Save.
Step 5: Add Canvas Roster to iClicker
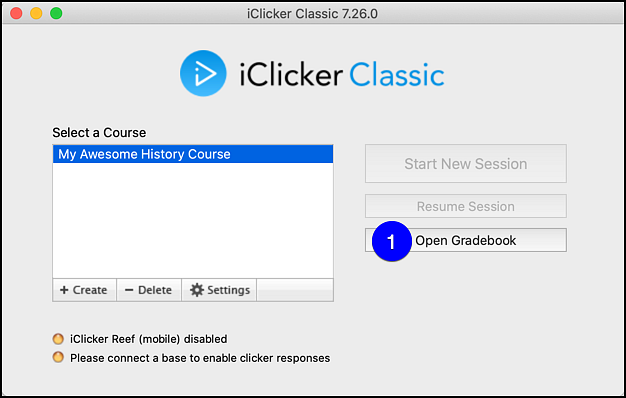
- Click on your course name and then select Open Gradebook [1].
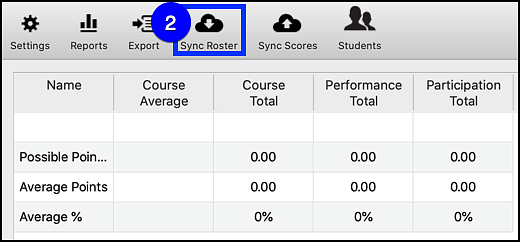
- Next, click on the Sync Roster [2] icon to sync your course roster between Canvas and iClicker.
- The message: "Student roster downloaded successfully" will pop-up, select Close and the names will populate.
Step 6: Making iClicker visible for Students on Course Navigation Menu
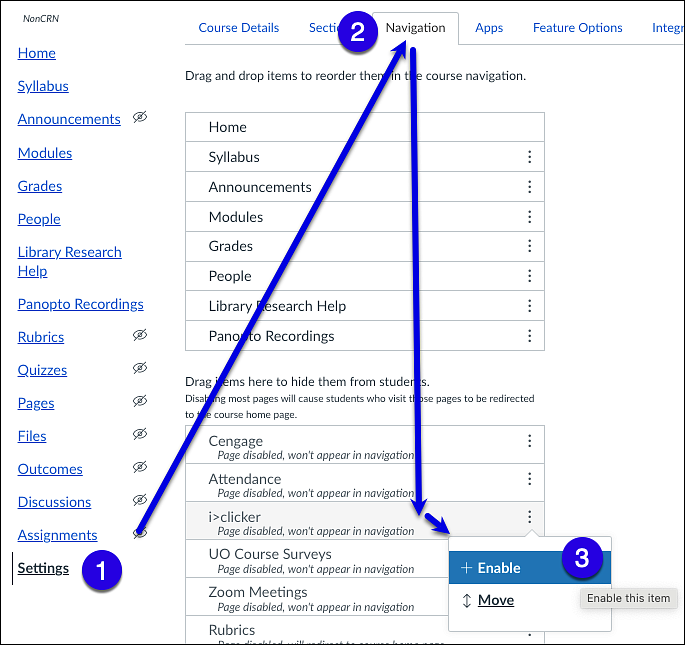
In order for students to register their iClickers, you must enable the iClicker item in Course Navigation.
1. Select Settings from the Course Navigation menu.
2. Select the Navigation Tab.
3. Find iClicker in the disabled items section. Select Options [⋮] and then select Enable. This will put iClicker in the list of items that students can see on the Course Navigation menu.
Remember to click Save at the bottom of the page to have the change applied.
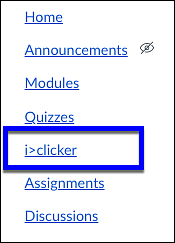
Students will now have iClicker available to them on the Course Navigation menu and will be able to register their iClickers.
iClicker Support
If you have additional questions, you can search or filter the iClicker Knowledge Base or reach out directly to iClicker’s customer support. (link opens in a new tab)