Adding Recorded Zoom Sessions to Panopto and Canvas

Adding Recorded Zoom Sessions to Panopto and Canvas

By recording Zoom sessions and later sharing them in Canvas, students who need more time reviewing the session or those who missed the session will have access. The following is a brief outline of how to record your session in Zoom and upload it to Panopto.

If you need general Zoom support not specifically using Canvas, such as account or licensing information, software updates, integrations with other software (Outlook), and using the HIPAA client please see these Information Services Zoom Pages

Related Topics: Zoom in Canvas, Canvas

Recording a Zoom Session

In an active Zoom meeting, a toolbar is available on the bottom of your Zoom window. Select the Record [1] button to record the meeting.

A dialogue box will open asking where you’d like the recording to be stored. Select Record on this Computer [2]. This is the recommended option because it will give you quick and easy access to the recorded files. Zoom meetings recorded to the cloud can take much longer to be made available for viewing or downloading.

Zoom record session to this computer option


Once the recording has begun, you can Pause or Stop the Recording using the Toolbar at the bottom of the Zoom window [1], or by using the Floating Toolbar [2] (usually in the upper left corder of the Zoom window.

Zoom pause and stop recording option buttons


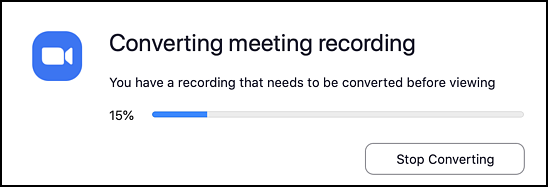
After the recording is stopped and you have ended the Zoom Meeting, you will see the Converting meeting recording window.

Zoom meeting file conversion window


Once the conversion is complete, the Zoom files will appear in your file explorer in a Zoom folder. You can save the files to the default Zoom folder or designate a new folder for the recorded files.

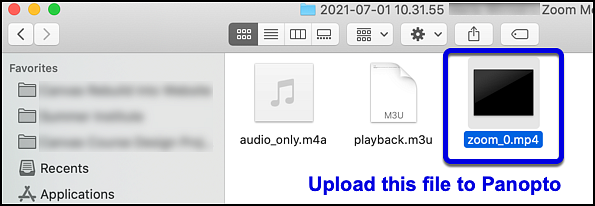
Take note of where the recorded files are saved as you will need to navigate back to this location to upload the recordings to Panopto. You can also leave the file location window open for quick access to the files.

saving Zoom recording to your computer


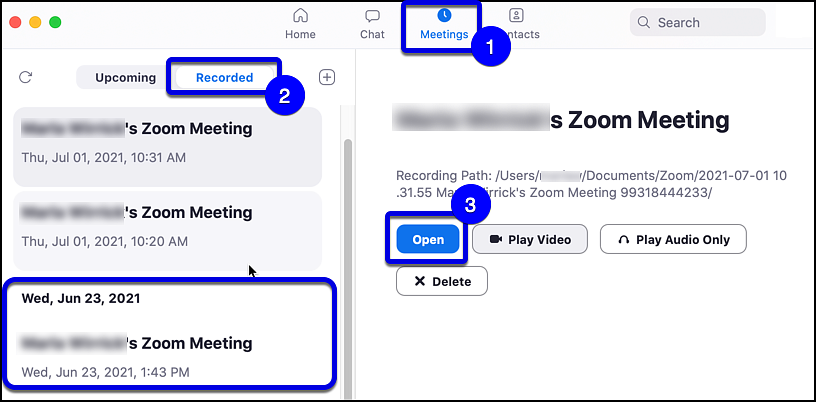
You can also find recordings in the Zoom app. Open Zoom and click on Meetings [1]. Next select the Recorded tab [2] on the left panel. Clicking on a recorded meeting in the left panel will open information about the session and options to access it in the right panel. Select Open [3]. This will open the folder on your computer where the recording is stored. Make a note of this folder location or leave the folder location window open as you move to the next step.

Zoom recorded meetings file window

Zoom Recordings in the Cloud

If you have Zoom recordings that have been saved to the cloud, you will need to upload them to Panopto.

Zoom recordings can process for a very long time before being available on the cloud. 

  • When the recording is available in the Zoom Cloud, the instructor is notified via email
  • Follow the link provided to access the video in the Zoom Cloud 
  • Hover over the file that is "Shared screen .... " and click on the Download button
Zoom Cloud download screen

Please note: Because UO Cloud storage in Zoom is limited, you are encouraged to record Zoom meetings on your computer. If you have meetings saved to Zoom cloud storage, you should download those to your computer and add them to Panopto Recordings in Canvas and delete them from Zoom cloud storage.

If a limited number of students (1-5) need access to the video, another option is to share a link to the video with those students via email. The Sharing Classroom Recordings in Panopto how-do guide describes this process. 

Upload the Recording to Panopto

Open the Canvas course where the recorded Zoom meeting will be placed and select Panopto Recordings on the Course Navigation Menu.


In the Panopto Recordings window, make sure the folder listed is for the correct course [1].

Select the Create [2] button then select Upload Media [3].

Panopto upload media


When the Upload window appears, verify the folder where the file will be uploaded [4] to ensure it is the correct course. If you have the saved files window location open, you can drag and drop the video .mp4 file directly to Canvas. Selecting the Choose video or audio files [5] option opens up file explorer or finder so you can locate the saved Zoom video file.

Panopto add uploaded files select video or audio files


Upload the File to Panopto

Locate the zoom files on your computer and double-click on the mp4 file to upload the file to Panopto.

Zoom mp4 file to upload to panopto


Watch for the Upload complete notice. Note that uploading a long lecture (30 minutes or longer) will take a while to upload. You can close this window now by selecting the X in the top right corner. While the upload is complete, the upload is most likely still processing and isn't quite ready for viewing. It is OK to close the window.

Zoom recorded meeting upload to panopto complete


When the video is ready for viewing it will appear in the list of Panopto videos on the Panopto Recordings page. The link to the video will turn into a live link.

panopto window showing uploaded zoom recorded meeting


If you haven't already updated the video title, you can do so now by selecting Settings then ​​​​​​Edit. Save your changes and exit the Settings window.

edit video title in panopto


Add Video to Canvas tool for viewing

For instructions on how to embed to or link to the Zoom recording you uploaded to Panopto, see Adding Panopto Videos to a Canvas Course.