This resource provides instructions on how to set differentiated access permissions for students to view videos of classroom lecture recordings. In order to share from your Canvas course, all videos should be uploaded to or recorded in a sub-folder in the course Panopto Recordings folder that only hosts lecture recordings. This will allow for different sharing permissions to be set for each individual video. Note that if you have saved the recorded videos to the Zoom Cloud, those videos can be shared directly from the Zoom Cloud. Instructions for sharing from the Zoom Cloud and Panopto Recordings follow.
Sharing Zoom Cloud Recordings
Access Recording in Zoom Cloud
When the recording that was saved to the Zoom Cloud is ready for viewing, you will receive an email with a link for the instructor - note that this link will only work for you, the Zoom meeting host
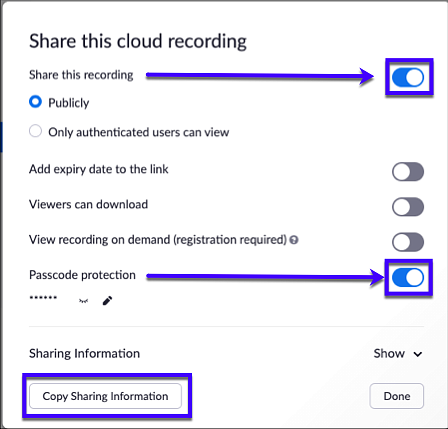
Open the link and click on the Share button (top right of screen)
Enable Share this recording
Select Only authenticated users can view
Enable Passcode protection if you want to add more protection
Click on the Copy Sharing Information for use in communication with students
Click on Done
Open a new email in Canvas or your email software, and paste the Sharing Information into the email
Send the email to students who should have access to the video
Managing Sharing Options for Lecture Recordings in Panopto
Create a sub-folder for lecture recordings
Videos recorded using Panopto Capture or Zoom recordings uploaded to Panopto should be stored in a separate sub-folder in the Panopto Recordings folder.
Click on the Add folder button
Enter name and hit the enter/return key
This new folder - Lecture Recordings - is ready for videos of lectures to be added
Next the settings for the folder should be set
Edit Settings for "Lecture Recordings" Folder
Open the new folder
Click on the Gear (Settings) icon in the upper right corner of the browser window
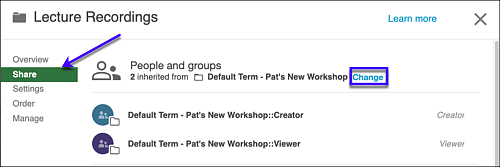
Select Share on the menu - note that by default the new folder is set to share with all students - if you want to limit sharing, continue and edit the sharing settings
Click on Change next to People and groups
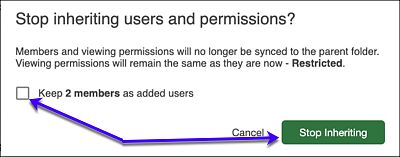
Now you will be removing permissions for all groups on the Stop Inheriting users and permissions screen
Uncheck the box that refers to Keep X members as added users
Click on the green Stop Inheriting button
Note: The instructor is maintained as a Creator for the folder
With these settings, students will not be able to see the Lecture Recordings folder if they click on Panopto Recordings on the Course Navigation Menu in Canvas. Only the instructor can see the folder.
Adding and Managing Videos in the Lecture Recordings Folder
Uploading/Recording Videos in the Lecture Recordings Folder
Uploading Zoom Videos
On the Create menu, select Upload Media
Select one or multiple .mp4 files to upload to the folder
Once the upload process begins, you can edit the title of the video
Zoom and Panopto both use dates and times for the default titles of videos, change your video titles to more meaningful titles - hover over the video and click on the Settings button
On the Overview menu click on Edit next to the name of the video, change the name, click Save
Using Panopto Capture
Before recording a classroom lecture using Panopto Capture, navigate to this folder
On the Create menu, select Panopto Capture
Record the lecture
Zoom and Panopto both use dates and times for the default titles of videos, change your video titles to more meaningful titles - hover over the video and click on the Settings button
On the Overview menu click on Edit next to the name of the video, change the name, click Save
Adding Users Sharing Permissions for a Video
Go to Settings for the video (gear icon)
Click on the Share option on the menu for video settings
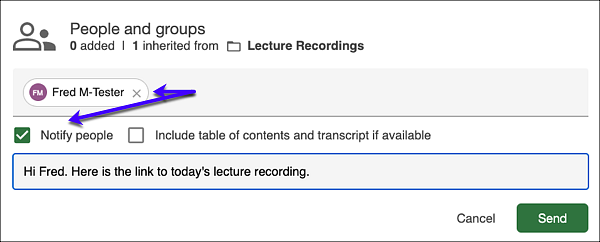
Begin typing a student's name or DuckID in the text box
Click on their name when it pops up - it will appear like "Fred's" name appears in the image to the right (you might need to click enter to select the name)
Add any other students who should have access
Put a check in the Notify people checkbox
Click on Send
It is a best practice to add yourself to the group with whom you are sharing the video. This will provide you with a copy of the email to confirm it was sent.
Student Notifications
With these access permissions the only way a student can play the video is to do so by clicking on the Play button in the email notification. You must send this notification (Notify People) and be sure to tell students this is how they access the videos.
Note: if a student is given access to a video, but not the folder the video is housed in, the student must use the link in the email notification to access the video, as they will not see the folder or video in Panopto Recordings. Some instructors have chosen to give all students access to the lecture recordings folder, allowing students to review the lectures and use them when studying.