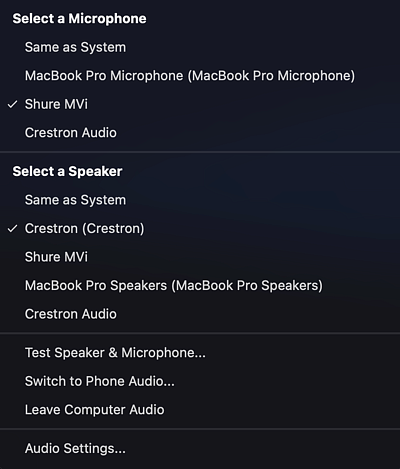
Classroom Lecture Recording with Zoom

Classroom Lecture Recording with Zoom

Use Zoom to record classroom lectures by connecting it to the room's audio and projection system. This captures both your lecture and the content displayed on the classroom screen. Just like recording remote classes, ensure you select the appropriate microphone and screen to share in Zoom.

These instructions focus on recording the projected content rather than capturing video of the speaker.

Steps to Record a Classroom Lecture with Zoom

  1. If the classroom lacks a microphone, use your laptop's mic.
  2. For better audio quality, consider using an external mic; email uoonline@uoregon.edu to borrow a USB microphone if needed, though supplies are limited.
  3. Review the University of Oregon's Classroom Recording Policy for clarification about policy.
  4. For equitable access, activate live transcription (closed captions) in Zoom settings and enable it during recording. Refer to Using Live Transcription for Zoom for guidance. Remember to enable live transcription each time you record a lecture.
  5. For students with documented Americans with Disabilities Act accommodation needs, consult accessibility guidelines on the Accessible Education Center website.

Preparatory Steps for Recording a Lecture in Zoom

  1. Schedule Zoom meetings for your class.
  2. Upon arrival in the classroom, connect your laptop to the microphone, camera, and HDMI cable.
  3. Open Zoom and any apps, such as PowerPoint, you intend to project.

Now, proceed to Step 1 to configure Zoom for recording your lecture.

Related Topics: Zoom in Canvas, Canvas

Step 1: Zoom Settings

Audio Settings

  1. Click the tiny arrow next to the Mute button on the Zoom toolbar.
  2. Under "Select a Microphone," choose the classroom mic system, typically Logitech MEETUP or Shure MVi.
  3. For the speaker, connect to the classroom system, usually labeled as Crestron Intel Display Audio or Crestron under "Select a Speaker."
Zoom Audio Settings menu

Video Settings: Camera

To prioritize the content shared on the projection screen, click Stop Video to turn off the instructor video. If you wish to include yourself in the recording, click the small arrow next to Start/Stop Video and choose either the room camera or your laptop's camera.
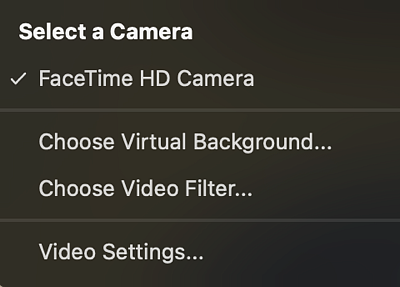
Zoom video settings


Projected Content

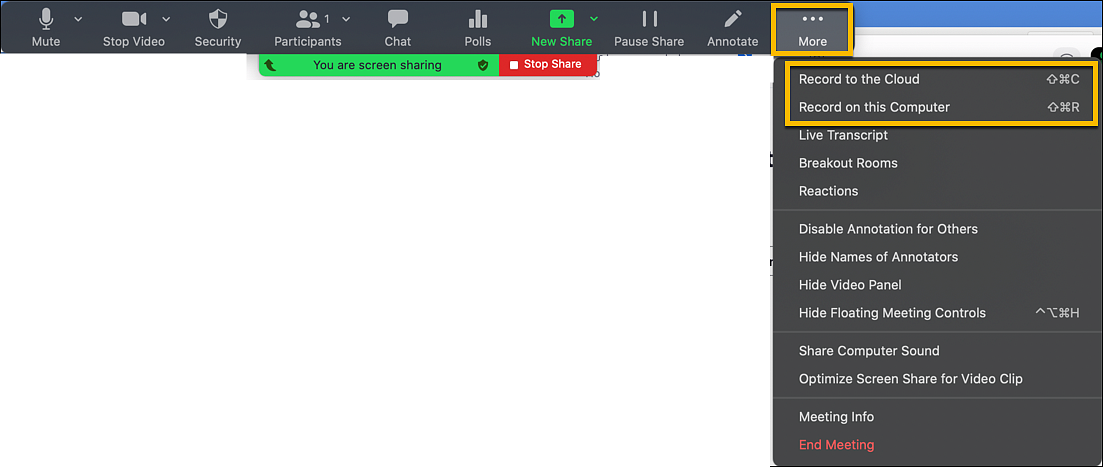
To capture the content being projected in the classroom, click Share Screen. Zoom will put a 1 or 2 on the projection screen to identify which screen to select. In most cases, it will be Desktop 2.

Screens to choose when screen sharing in Zoom


Step 2: Recording the Zoom Meeting

Starting and Stopping the Recording 

Recording can begin before or after screen sharing. When you click Record for the first time, you'll choose between recording on your computer or to the cloud. Recording to the cloud may delay accessing the recording in Canvas as it requires downloading and uploading. We recommend recording to your laptop for efficiency.

To start recording before screen sharing, click Record on the bottom toolbar and use the same button to stop once screen sharing ends.

Zoom screen share toolbar

Alternatively, during screen sharing, click More on the top toolbar and choose Record to the Cloud or Record on this Computer. The recording begins immediately upon selection. Stop by clicking More again and selecting Stop Recording.

Zoom screen share toolbar


Step 3: Adding the Zoom Recording to Canvas/Panopto

Zoom Cloud Recording

Zoom cloud processing times can be lengthy.

Once the recording is available in the Zoom Cloud, instructors receive an email notification.

Follow the provided link to access the video in the Zoom Cloud.

Hover over Shared screen with speaker view and click the download icon.

Note: Due to limited UO cloud storage, record meetings on your computer. If recorded to Zoom Cloud, download to your computer and add to Panopto recordings in Canvas, then delete from Zoom Cloud.

For sharing with one to five students, send the video link via email. Refer to the guide Sharing Classroom Recordings in Panopto.

Zoom Cloud download screen

Uploading Recording to Canvas

  1. In Panopto, create a new folder for classroom recordings for easier sharing management.
  2. Open the new folder and click Create at the top, then choose Upload media to upload the .mp4 file. This ensures the video is added to the lecture recordings subfolder.
  3. Allow time for the .mp4 file to upload and for Panopto to process it.
  4. While we encourage making lecture recordings available to all students, consider limiting access to specific students when needed.
Panopto Create menu with Upload media option outlined

Zoom Recording on Instructor Laptop

Recorded sessions on your laptop are organized in folders by date and time, with the folder named accordingly (e.g., "2021-09-27 15.00.17").

  1. Open the folder and locate the zoom.mp4 file.
  2. Access Panopto in your Canvas course.
  3. Create a new folder in Panopto for classroom recordings to manage sharing permissions easily.
  4. Within the new folder, click Create and select Upload media to upload the .mp4 file. This ensures it's added to the lecture recordings subfolder.
  5. Allow time for the .mp4 file to upload and for Panopto to process it.

Sharing Recordings with Students

Refer to the following pages for instructions on sharing recordings with students: