Rubrics to Evaluate Student Work

Rubrics to Evaluate Student Work

Rubrics are helpful to clearly state the criteria you evaluate the performance of in any assignment and give your students an idea about how you will evaluate their work, and what it might look like. Rubrics can be useful for self-assessment, peer-assessment as well as formative and summative assessments.

Rubrics, if used properly, can be a good vehicle to bring transparency and equity into the assessment, because sharing the expected work would especially improve the success of historically marginalized students (Winkelmes, 2016). The hidden curriculum of the higher education, the un-spoken academic expectations of students and requirements, can be challenging for people with marginalized identities (low-income, first-gen, etc.). Becoming transparent about the grading system is helpful for students to understand your expectations of a student work. You are an expert in what is and is not good student work—rubrics are a tool to help you articulate that expertise for your students.

Rubrics are helpful for the following reasons:

  • Promote clarity, consistency, and fairness in grading.
  • Help students self-regulate and improve their work before submission.
  • Provide a structured way for peer assessment to be meaningful and actionable.


Understanding Rubrics

Rubrics are tools for describing varying levels of student performance at achieving success on an assignment. They describe for students what differing levels of success look like so that they have clear goals when working on their assignment. 

Rubric Grid

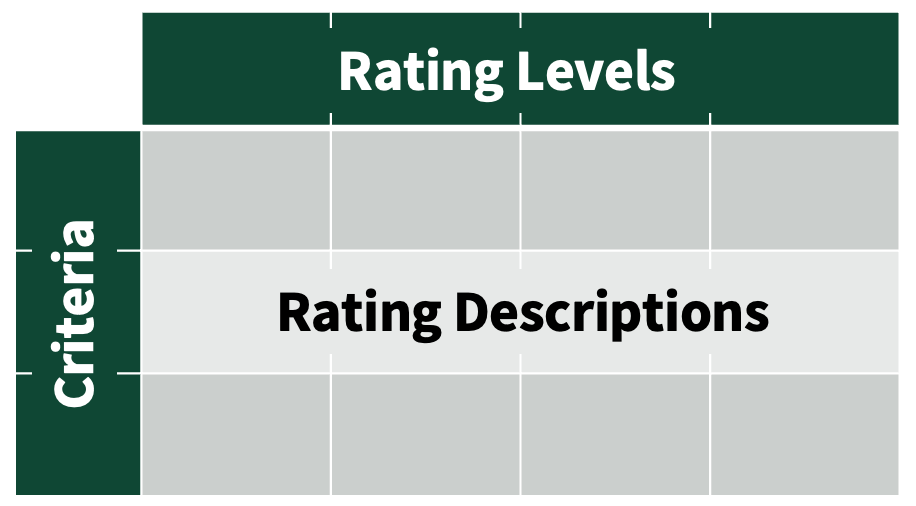
A rubric is generally, but not always, arranged in a grid, as shown to the right and described below. Each rubric has three main parts, detailed below and labeled in the image. Note that for this guide, the name of each part and their arrangement is to match Canvas's rubric editor. 

  • Criteria are names for what is being evaluated. These are generally recommended to be performance items (e.g. “arguments supported with evidence,” “jeté,” or “graph clarity”) to measure your learning objectives. It is okay to break the student product into pieces (e.g. “thesis statement,” “experiment procedure”, or “use of subjunctive”) to use your criteria, if your rating descriptions clearly point to learning objectives. In our grid, criteria are listed vertically down the grid.
  • Rating levels give titles to student success ("outstanding," "competent", "developing," etc.). These may also include points assigned for each level to ease grading (called a Rating Score in Canvas). In our grid, rating levels are listed horizontally along the top of the grid.
  • Rating descriptions describes the characteristics of student work at each of the different rating levels for each criterion. It tells a student what properties of their work look like for a given level of success. In our grid, rating descriptions fill in each position on the grid.

Rubrics do not need to be arranged in a grid. Each criterion could be named and followed by a list of rating levels and descriptions. This format may be easier to read if rating descriptions are long or more accessible to students using digital screen readers.

For student evaluations, instructors match student work with the appropriate descriptions given in the rubric. Rubrics are also effective peer-review tools as students can view each other's work and evaluate it with the rubric. This not only gives students feedback on their work before submitting it for grading, but it also helps students better understand how you grade and what performance details are important to you.

In this guide, rubrics described are examples of analytic rubrics, which break down student performance into separate criteria. There are also holistic rubrics, which assign a single overall score based on general performance descriptors rather than discrete criteria.

Other Rubric-like Evaluation Tools

There are several additional evaluation tools that are similar to rubrics but are lacking key features of a rubric.

  • Checklists only have named criteria. They allow for binary included/missing determinations without evaluating the quality of student work.
  • Performance lists include only criteria and rating levels. Using one lets you quickly tell students how successfully they have achieved each trait, without previously describing what the proficiency levels looks like.
  • Scoring guides include criteria but describe only what proficiency with each criterion looks like. They do not describe performance at all rating levels. Instead, instructors must give comments detailing how close students came to achieving proficiency with each criterion. You can read more about describing student proficiency in step  3 of the rubric design method below.

You can also create a hybrid assessment which combines pieces of a rubric with one of these other tools. For example, for an essay you could combine a checklist and a rubric. The checklist could address lower order "style" elements (reference use and format, essay length, specific format, etc.). The rubric could address higher level elements meshing with the learning objectives of your course or the assignment (supporting arguments, examples from the reading, use of a specific critical lens, etc.). 

Building Rubrics in Canvas

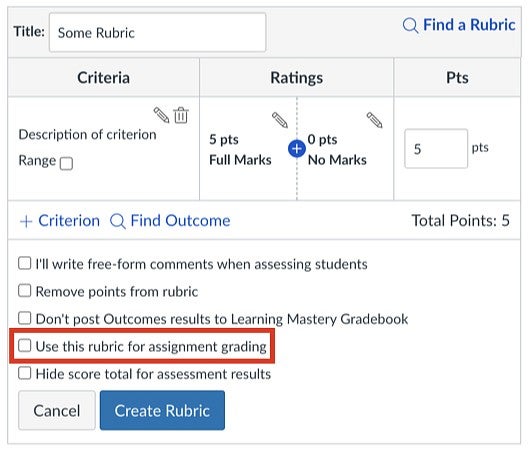
Canvas can be used to build rubrics for assignments, quizzes, and discussions. For both assignments and discussions, the rubric can be used to define a score for the student's work, but in quizzes rubrics can only be used for feedback rather than to build a score.

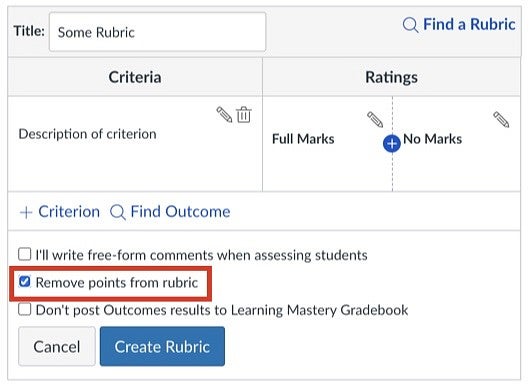
To add a rubric to any of these items in Canvas, click on the "+ Rubric" button below the description when viewing (not editing) an activity in Canvas. Read more about building and editing rubrics in Canvas from Instructure or view notes about using rubrics in Canvas to create an assignment grade below.


Designing Rubrics

There are several steps to designing an assignment with a rubric. If you already have an assignment which you are developing a rubric for, you can skip right to step 2!

1. Define learning objectives and student task for assignment

For your assignment, what are students going to do (task) and what do you want them to learn from it (learning objectives)? These may already exist for an assignment, and you are just adding a rubric to evaluate student work.

2. Define observable criteria that demonstrate learning objectives

Your criteria should directly reflect the learning objectives for the assignment (and your course). You may have different learning objectives may be different for different courses, even on similar assignments. This should be reflected in your criteria. 

For example, consider a presentation on an archaeological excavation for a 100-level and for a 400-level course. For the 400-level course, criteria could focus on placing the excavation's artifacts in the broader context of the history of the surrounding region. But for the 100-level course, that criteria may be beyond what most students are expected to be able to do at that point in their studies. Instead, 100-level criteria may focus on basic presentation skills (speaking, eye contact, slide clarity, etc.) if those better fit the course's learning objectives.

Keep criteria names to short phrases. Your rating descriptions (steps 3 and 5) give details of what is expected. Consider the questions below when determining criteria (adapted form Stevens & Levi, 2013).

  • Why did you create this assignment?
  • What qualities did you observe in student work on this assignment or a similar assignment you have given before?
  • How does this assignment relate to the rest of what you are teaching?
  • What skills will students need to have or develop to successfully complete this assignment?
  • What evidence can students provide in this assignment that would show they have accomplished what you hoped they would accomplish when you created the assignment?
  • How does this assignment align with professional expectations or career standards in your field?

These questions can also help you with setting performance standards for the next step.

3. Define a performance standard for each criterion

A performance standard is what you are judging student work against. They could be based on either:

  • Proficiency - What does a student achieving your learning objectives for a criteria look like?
  • Highest Achievable Student Work What do you imagine the absolute best student work would look like?

For the standard you use choose, describe the properties, results, or actions of students achieving this standard.

Do not just repeat assignment instructions. Instead, describe what success at the instructions look like. If students are writing an essay, one criterion may be the essay's structure. Your standard could be "Reader easily identifies your thesis, supporting arguments, and conclusion" rather than "Uses five-paragraph format". The five-paragraph format may appear in the task description, but your standard is telling what qualities are important to an essay's structure.

4. Select number of rating levels and their titles

You should only have enough rating levels to clearly distinguish between each level. Three to five are generally good. Start with a smaller number and add more if needed when revising the rubric or as you start describing different levels of achievement in step 5.

Titles should be generally positive, and the titles for lower levels should encourage growth to higher levels.  Below are some sample names for rating levels:

  • High Achievement, Medium Achievement, Low Achievement
  • Proficient, Intermediate, Basic
  • Exceeds Expectations, Meets Expectations, Below Expectations
  • Sophisticated, Proficient, Marginal, Unacceptable
  • Advanced, Proficient, Nearing Proficiency, Not Yet
  • Fully Developed, Developed, Mostly Developed, Underdeveloped
  • Mastery, Accomplished, Progressing, Novice, Missing
  • Exceptional, Experienced, Capable, Developing, Emerging, Beginning

Mix and match names from these samples to fit your teaching style and rubric design.

5. Define rating descriptions relative to your standard

These are the key features of a good rubric. Well written rating descriptions reveal to students how they've fallen short of your standards or how they can go beyond being just "proficient" with a learning objective. This saves you grading time as you've pre-written comments for students. They also give students clear indicators of what they need to do to advance to higher levels.

When writing your descriptions, highlight key ways that students may fall short of your learning objectives. The severity of each shortcoming gives you a sense of where they fit in your rating levels to show where along their progress to meeting your learning objectives a student falls. It is fine for you have multiple descriptions at one level.

For example, if one criterion for a student's ballet performance is success a doing a pirouette, some shorting comings may involve imprecise head control, incomplete rotation, body being unaligned over supporting leg, supporting knee bends, and falling over. These represent varying degrees of progress toward doing a correct pirouette (with falling over probably at the "bottom" end of the rubric). If incomplete rotation and the supporting knee bending are at similar stage of progress in doing a pirouette, they can be included in the same rating description.

Keep language clear and student-friendly to reduce confusion. You, your students, and all graders should be on the same page as to what each criterion and rating description means. Sharing sample student work at each rating level can also be helpful. Try to share multiple examples of "good" work or students may just try to mimic the one "good" example you've shared.

Use specific performance descriptors instead of vague terms like "good" or "needs improvement". You are describing what performance at each level looks like; its comparison to your standard is known from where it falls in your rubric.

6. Test rubric on sample student work and revise as needed

Once you've drafted a rubric, examine samples of student work (either from prior iterations of the assignment or work for this assignment) both without the rubric and by using the rubric. Your expertise with the material should give you a strong sense of how successful an example of student work is and what sort of grade you think it should earn. When you examine the work again with your rubric, does the rubric give about the same grade as your "gut" thinks it should earn?

If your rubric results in a much higher or lower score for student work than you think it earned, your rubric may not be well aligned with your learning objectives. Reassess your rubric's criteria and if they really reflect what you want your students to demonstrate in their work. 

For example, if you want your students to learn to write a persuasive letter to the editor, all your criteria shouldn't be linked to letter structure. If they are, your students could earn top marks for a well-structured letter even if it struggles to persuade anyone to even care about the topic, let alone to act on it in a certain way. Instead, adjust your criteria to reflect elements of good persuasive writing and rewrite your rating descriptions to describe levels of progress towards successfully using them.

You can also share your rubric with students and get their input in its clarity and utility. You could even start from a blank slate and co-develop your rubric with students after describing the assignment to them. This ensure everyone is on the same page as to what success looks like.

7. Determine grading scheme

How can you turn various descriptors of student performance into one grade for the assignment? Details about doing this are below! 


Going From Descriptions to a Grade

At their core, rubrics are just describing qualities of various levels of performance. Using those descriptors to evaluate the success in achieving a learning objective to assign your students a grade goes a step farther. There are several methods to do this as outlined below. Whatever method you chose to turn your rubric scoring into a grade, make sure it is transparent to your students.

After the methods are outlined, there are notes on using Canvas rubrics to grade an assignment.

Assign a Holistic Letter Grade

Directions: Based on how often students have achieved proficiency in your rubric, assign an overall letter grade to the work. Be sure it is transparent to students how you are mapping their rubric results to a grade.

For example, you could imagine a 5-rating level rubric corresponding to letter grades A, B, C, D, and F. If a rubric shows most of a student's work in the B range, with a couple in lower ranges, their overall grade may be a B-. Or if they also have some in the A range, maybe the lower and higher ranges cancel, and their overall grade is a B.

Using this method will depend on your individual course or the expectations of your discipline. If all your other assignments are graded as percentages, how do you appropriately include a letter grade for an assignment with a letter-grade rubric? 

Assign Points to each Rating Level

Directions: Assign each rating level a numerical score. After evaluating a student with a rubric, sum the points earned for each criteria to make the student's grade on the assignment. See the sample below for an even-scoring method.

Exemplary
(4 points)
Proficient
(3 points)
Developing
(2 points)
Novice
(1 point)

This is the method that Canvas will use if you allow it to automatically create an assignment grade based on the rubric. When editing a rubric in Canvas, you assign points to each rating level with the “Rating Score” in the Edit Rating window and a maximum score for each criteria when viewing the whole rubric. You can assign individual rating scores using any point value you feel is appropriate. This example is an even scoring method, where each level increases by the same amount (1 point).

Using even scoring between rating levels can lead to "harsh" scoring. Using the above example, if a student is proficient in all the criteria (meaning they’ve achieved all the learning objectives), their average score is 3 out of 4 points, a 75%. If a student falls just short of all your learning objectives, their average score is 2 out of 4 points, or a 50%. Do those sit well with you?

Assign Uneven Points to each Rating Level

Directions: Assign each rating level an uneven score in your rubric and then sum the points across the rubric. See the sample below.

Exemplary
(8 points)
Proficient
(7 points)
Developing
(5 points)
Novice
(2 points)

Using this uneven scoring method, being a student showing proficient work for all criteria earns 7/8 of the total points, or 88%. You can adjust the score value for each level to suite your course and grading philosophy. Canvas will let you set any point value you want to each rating level (including using the same point value for multiple rating descriptions if desired). 

Add a Student’s Average Rating Score to a Base Score

Directions: Assign even scoring to each rating level. Calculate a student’s average point value across criteria, then add a fixed number of points to the average to produce their overall score on the assignment.

This method also helps avoid “harsh” grading of even scoring. If proficiency is 3 out of 4 points in your rating scores, adding a base score of 4 points changes that “proficiency” level to be 7 out of 8 points, 88%. Being just shy of proficient then gives a score of 2+4=6 out of 8 points, or 75%, a "standard" C-level grade, rather than 2/4 or 50% if you hadn't added the base score. 

Use a Range of Points for each Rating Level

Directions: For each rating level, allow there to be a range of points students can earn. When grading, you can select different points values at the same rating level to account for quality of student work more directly. Consider the example shown below.

Exemplary
(10-9 points)
Proficient
(8-6 points)
Developing
(5-3 points)
Novice
(2-1 points)

Work that does achieve the "proficient" level, for example, may look different for different students. One student's speech may be clearly and concisely explained,  while another may get to the same point after some meandering.  If your criterion is focused on the end point of the speech, both students could be proficient at your learning objective, but the second could be improved to be more concise. So you could assign both examples "proficient" ratings, but the one that needs work only earns 6 points, while the clear one earns 7 or 8. When giving feedback, you can use the same rating description for both, but leave brief written comments as to why each earned the points that it did.

You can achieve a similar effect for rubrics where you don't use points by marking the rubric with a "check", "check-plus" and "check-minus" system. When evaluating work with the rubric, you use the different markings to indicate work is sufficient (check), excellent (check-plus) or could use a bit of improvement (check-minus), even while all fall into the same rating level. This method works well for formative assessment where you are checking on student progress before final grading or for a holistic grading scheme as described above.

Make a Scoring Table

Directions: Assign even scoring to each rating level. Calculate a student’s average point value across criteria and then use a table to convert that score to a percentage. See the table below for an example (adapted from Brookhart, 2013).

Median rating score of         
criteria (4 point scale)         

Assignment Score 
(out of 100)               

    4.0    99
    3.5    92
    3.0    85
    2.5    79
    2.0    75
    1.5    67
    1.0    59

Note that this table uses a student’s median score across criteria rather than the average. Brookhart argues strongly for using the median score as it overlooks the influence of particularly high or low scores and provides a more holistic view of the work. You can quickly calculate the median by listing all criteria scores a student earned in order from lowest to highest. Repeatedly cross out both the lowest and highest score in your list until you have just one or two scores left. If you have an odd number of criteria in your rubric, you will have just one score left, and that is the median value. If you have an even number of criteria in your rubric, you will have two scores left, and the average of the two remaining is the median.

This again avoids the “harsh” scoring of even scoring and lets you easily adjust what seems fair to you, your course, and your discipline’s expectations. You could even adjust from the table a little bit based on student performance. If a student’s median is 3.5, but parts of their work is excellent, you could reward them with a few extra points above what the table suggests. Deviating “downward” is not recommended as students who perform at a certain level expect a specific score based on the table. 

Assigning a Grade from a Rubric in Canvas

Canvas can automatically assign a grade to an assignment using a rubric, but it can ONLY sum the rating score that you’ve assigned to each rating level. When editing a rubric in Canvas, edit each rating level for all criteria to give them a “Rating Score”. Canvas will sum the score associated with each criterion to use as the score in the gradebook. In Canvas, you can assign even or uneven rating scores, you can have different number of ratings for different criteria, and you can even have multiple rating levels with the same score.

If you want to use any other method that the even-scoring or uneven-scoring described above, you have two options when designing a rubric in Canvas:

  • Check the “remove points from rubric” option, as shown on the left image below. Canvas will completely remove rating scores and points from the rubric. You will ONLY choose rating descriptions, but you must then manually assign a grade to the whole assignment. This is useful if you want to give a holistic letter grade instead of a point total.
  • Uncheck the “Use this rubric for assigning grading” option, as shown on the right image below. Canvas will still show scores and still sum them for you, but it will not copy the grade into its grade book. After using the rubric, you must manually assign a grade. This is useful if you want to add a base score to a student’s grade or you want to use a scoring table.
Remove points in Canvas's rubric designer
Remove rating scores in Canvas's rubric designer
Do not use for grading in Canvas's rubric designer
Do not use the rubric's rating scores as a grade in Canvas

More Resources

References and Further Reading

  • Allen, D. & Tanner, K. (2006) Rubrics: Tools for Making Learning Goals and Evaluation Criteria Explicit for Both Teachers and Learners. CBE—Life Sciences Education. 5.3.
  • Arter, J. & McTighe, J. (2001). Scoring Rubrics in the Classroom. Corwin Press.
  • Banta, T.W., Palomba, C.A. & Kinzie J. (2014). Assessment Essentials : Planning, Implementing, and Improving Assessment in Higher Education. Second edition. John Wiley & Sons.
  • Brookhart, S.M. (2013). How to Create and Use Rubrics for Formative Assessment and Grading. Association for Supervision & Curriculum Development.
  • Chaaban, M. (2019) Best Practices for Designing Effective Rubrics. Arizona State University Teach Online.
  • Hubba, M.E. & Freed, J.E. (2000). Learner-Centered Assessment on College Campuses. Allyn & Bacon.
  • NC State University. Rubric Best Practices, Examples, and Templates. DELTA Teaching Resources.
  • Stevens, D.D. & Levi, A.J. (2013) Introduction to Rubrics. Second Edition. Stylus Publishing.
  • University of Nebraska – Lincoln. How to Design Effective Rubrics. Center for Transformative Teaching.
  • Walvoord, B. E. F., & Anderson, V. J. (2010). Effective grading. Second edition. Jossey-Bass.